AUTOTRAC® 2-SPEED TRANSFER CASE
HOW THE AUTOTRAC® 2-SPEED TRANSFER CASE WORKS

Starting At: {{starting_price}}{{starting_price_disclosure}}
As Shown : {{as_shown_price}}{{as_shown_price_disclosure}}
Starting At: {{starting_price}}{{starting_price_disclosure}}
As Shown : {{as_shown_price}}{{as_shown_price_disclosure}}
Starting At: {{starting_price}}{{starting_price_disclosure}}
As Shown : {{as_shown_price}}{{as_shown_price_disclosure}}
Starting At: {{starting_price}}{{starting_price_disclosure}}
As Shown : {{as_shown_price}}{{as_shown_price_disclosure}}
Starting At: {{starting_price}}{{starting_price_disclosure}}
As Shown : {{as_shown_price}}{{as_shown_price_disclosure}}
Starting At: {{starting_price}}{{starting_price_disclosure}}
As Shown : {{as_shown_price}}{{as_shown_price_disclosure}}
Starting At: {{starting_price}}{{starting_price_disclosure}}
As Shown : {{as_shown_price}}{{as_shown_price_disclosure}}
Starting At: {{starting_price}}{{starting_price_disclosure}}
As Shown : {{as_shown_price}}{{as_shown_price_disclosure}}
Starting At: {{starting_price}}{{starting_price_disclosure}}
As Shown : {{as_shown_price}}{{as_shown_price_disclosure}}
Starting At: {{starting_price}}{{starting_price_disclosure}}
As Shown : {{as_shown_price}}{{as_shown_price_disclosure}}
Starting At: {{starting_price}}{{starting_price_disclosure}}
As Shown : {{as_shown_price}}{{as_shown_price_disclosure}}
Starting At: {{starting_price}}{{starting_price_disclosure}}
As Shown : {{as_shown_price}}{{as_shown_price_disclosure}}
Starting At: {{starting_price}}{{starting_price_disclosure}}
As Shown : {{as_shown_price}}{{as_shown_price_disclosure}}
Starting At: {{starting_price}}{{starting_price_disclosure}}
As Shown : {{as_shown_price}}{{as_shown_price_disclosure}}
Starting At: {{starting_price}}{{starting_price_disclosure}}
As Shown : {{as_shown_price}}{{as_shown_price_disclosure}}
Starting At: {{starting_price}}{{starting_price_disclosure}}
As Shown : {{as_shown_price}}{{as_shown_price_disclosure}}
Starting At: {{starting_price}}{{starting_price_disclosure}}
As Shown : {{as_shown_price}}{{as_shown_price_disclosure}}
Starting At: {{starting_price}}{{starting_price_disclosure}}
As Shown : {{as_shown_price}}{{as_shown_price_disclosure}}
Starting At: {{starting_price}}{{starting_price_disclosure}}
As Shown : {{as_shown_price}}{{as_shown_price_disclosure}}
Starting At: {{starting_price}}{{starting_price_disclosure}}
As Shown : {{as_shown_price}}{{as_shown_price_disclosure}}
Starting At: {{starting_price}}{{starting_price_disclosure}}
As Shown : {{as_shown_price}}{{as_shown_price_disclosure}}
Starting At: {{starting_price}}{{starting_price_disclosure}}
As Shown : {{as_shown_price}}{{as_shown_price_disclosure}}
Starting At: {{starting_price}}{{starting_price_disclosure}}
As Shown : {{as_shown_price}}{{as_shown_price_disclosure}}
Starting At: {{starting_price}}{{starting_price_disclosure}}
As Shown : {{as_shown_price}}{{as_shown_price_disclosure}}
Starting At: {{starting_price}}{{starting_price_disclosure}}
As Shown : {{as_shown_price}}{{as_shown_price_disclosure}}
Starting At: {{starting_price}}{{starting_price_disclosure}}
As Shown : {{as_shown_price}}{{as_shown_price_disclosure}}
Starting At: {{starting_price}}{{starting_price_disclosure}}
As Shown : {{as_shown_price}}{{as_shown_price_disclosure}}
Starting At: {{starting_price}}{{starting_price_disclosure}}
As Shown : {{as_shown_price}}{{as_shown_price_disclosure}}

Purchase or lease a new GMC and your first visit is covered.
Difficulty Level: Intermediate | Time Required: Two Minutes | Tools Required: None | Related Parts, Products, Services or Technology: None
Choose the right 4WD transfer case mode for your drive
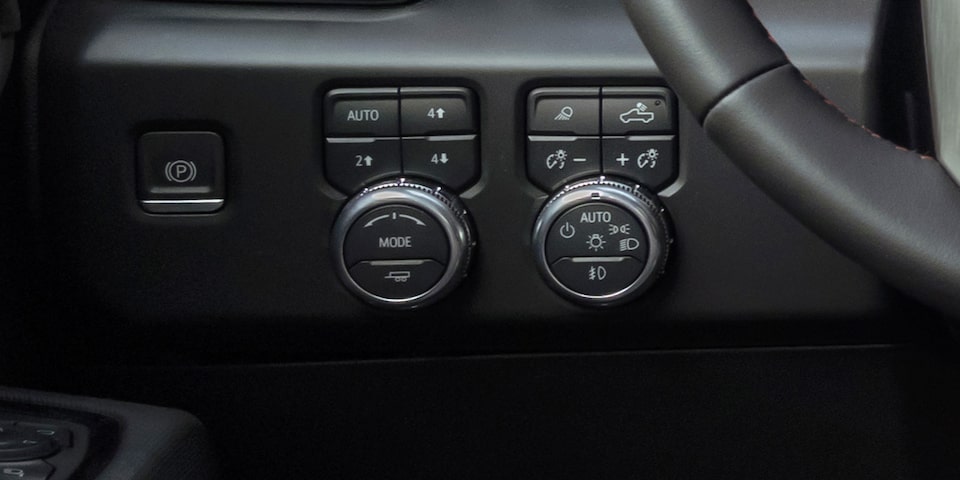
If equipped, you can select the ideal 4WD mode with electronic controls that adjust your vehicle's AutoTrac 2-speed transfer case (available on some 4WD vehicles). This is designed to help improve your vehicle's handling in different driving conditions.
Different 4WD modes can be selected for specific on- or off-road conditions. These modes are electronically controlled by an AutoTrac® 2-speed transfer case.
The way you change modes depends on your vehicle. There will either be a knob or a row of buttons located on your instrument panel to the left of the steering wheel. If using a knob, simply rotate the knob to reach the desired mode. If using buttons, simply press the button to select your desired mode.

What Drive Modes Can I Select?
Depending on your vehicle's equipment, modes may include:
2 Hi:
4 Auto:
4 Hi:
4 Low:
Neutral:
For your security, please don’t include personal info such as phone number, address or credit card details.
No. The transfer case is designed to be "shifted on the fly," allowing you to change modes without bringing the vehicle to a stop. However, to shift into or out of 4 Low, the vehicle must be moving at less than 5 km/hr (3 mph).
On some models, an indicator on the selector knob or button will flash while the mode is being switched and will turn solid once it is fully engaged. On other models, an indication will appear in the Driver Information Centre (DIC).
To find out if your vehicle has this feature, contact your dealer or refer to your vehicle's equipment list. Please check your Owner's Manual for more information about features.
Legal GM Privacy Statement Accessibility
© General Motors of Canada Company
You are leaving gmccanada.ca
You are leaving gmccanada.ca to visit a website that is operated independently and not maintained by General Motors of Canada and where the General Motors of Canada privacy policy does not apply.
This link is provided to you for convenience and does not serve as an endorsement by General Motors of Canada of information or content that you may find on this site.
